
How to install a kitchen sink
Whether you are installing a kitchen sink in a new kitchen or replacing an existing sink, consider these common problems – and the solutions – before you begin.
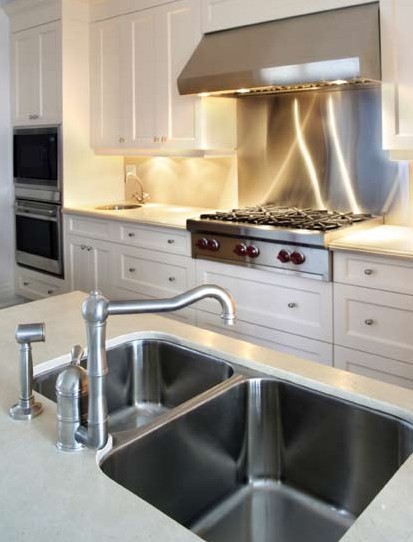
Stainless steel sinks are usually top-mounted (also known as self-rimming, over-mount or drop-in), which is essential if you are installing the sink in a laminate countertop. The rim or lip of the sink covers the edge of the laminate and keeps water from de-laminating the surface.
Stainless steel sinks can be mounted below the countertop (also called under-mounted or sub-mounted) but only if the countertop is made of solid surface or natural stone.
Porcelain or enameled sinks have a porcelain coating, usually over cast iron. While the surface is very hard and resistant to heat and staining, porcelain sinks are heavy and should be top-mounted in a sturdy countertop that can hold the weight.
Acrylic sinks are less popular for kitchens because they are lightweight, not resistant to high temperatures, and the finish can melt or crack when exposed repeatedly to hot pans or boiling water. However, if you are installing an acrylic sink in a kitchen, it should be top-mounted.
Composite sinks are engineered to look like stone and are typically fabricated directly into a countertop made of the same material – called a flush-mount. Since the sink is integral with the top, no sink installation is required, but related issues, such as the adequate space in the cabinet below and the number, size and location of holes for faucets and accessories must still be coordinated as with any sink installation.
Solid-surface sinks are similar to composite sinks and are flush-mounted in a countertop made of the same material. The seam between the sink and the top is filled and sanded smooth so it is almost invisible.
TIP
When installing a sink and faucet assembly, save time by installing the faucet, supply lines and other accessories BEFORE you set and attach the sink to the countertop. It is easier and faster.
Problem: How to install a kitchen sink
The countertop is new and I have to cut the opening (or the sink I removed was smaller and I am making a new opening).
Solution
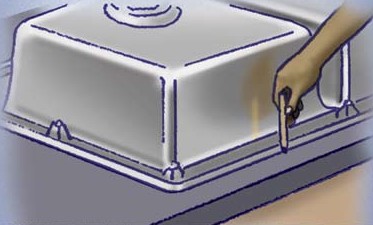
Turn the sink upside down on the countertop where you want to install it. Trace a line all the way around the sink edge.
Top-mounted sinks come with a paper template that allows you to locate the sink on the countertop and establish the cut line. If a template is not available, turn the sink upside down on the countertop where you want to install it.
When you are sure you have the necessary space to the front and rear of the sink and that the front sink edge is parallel to the front edge of the countertop, trace a line all the way around the sink edge.
The inner line is your cut line. Start the cut by drilling a ¼-inch hole about 1 inch inside your cut line, and then enlarge that hole with a ½-inch bit.
Put masking tape on the heel of your jigsaw to prevent it from scratching the surface of the top, insert the jigsaw blade into your ½-inch hole and complete the cutout. Be very careful not to let the blade wander outside the cut lines.
Remove the sink, and draw a second line approximately ½ inch inside the line you traced. The inner line is your cut line.
Remove the sink, and draw a second line approximately ½ inch inside the line you traced.
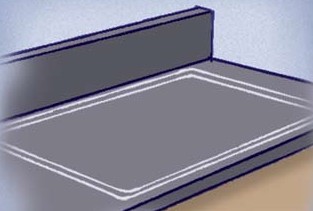
Under-mount sink cutouts must be nearly perfect. If the countertop is stone or solid-surface material, it is preferable to have the cutout done by the countertop fabricator. If you will be making a cutout in a solid-surface countertop, do not install it until the cutout is made.
First, establish the finished cut line using the paper template provided with your sink or by tracing the outline of the sink on the countertop.
Then fabricate a router template, using ½-inch thick MDF or another material that has a smooth, uniform edge when cut. (Note: This is not to be confused with the paper template that comes with your sink; this router template will guide your router on the initial cut in the countertop).
Typically, the distance from the sink cut line to the edge of the cutout in the router template should be about 2-½ inches, but do a few test cuts on scrap lumber to confirm the proper dimension. Once you have created the router template, secure it to the countertop with clamps.
Drill a starter hole in one corner, and enlarge it, as needed, to provide a starting point for the router. Use a flush-cut bit that gives you a square-edged cut and cut the opening for the sink following the template.
For an under-mount stainless steel sink, after the hole is cut to the proper size, use a round-over router bit to create a small radius on the square edge of the initial cut (also called an “eased” edge). Flip the top over and ease the lower edge of the cutout. Finally, sand the edge smooth and you are ready to install the sink with the clips and ferrules provided.
For a solid-surface sink, verify the first cutout is accurate and then mount the sink to the countertop using the suggested solid-surface epoxy adhesive. Once the adhesive is set, use a round-over router bit to finish the edge where the bowl meets the countertop.
These bits are specific to the sink you are using, and should match the slight angle at the top of the sink bowl. The sink manufacturer should supply you with the correct type/model of bit. After fine-sanding the edge, you should not be able to see the joint between the sink and the countertop.
Problem: Should I use plumber’s putty or silicone caulk?
Solution

When installing a top-mounted sink, apply a thick bead of silicone caulk around the rim prior to seating the sink in the countertop.
Plumber’s putty is a soft vegetable oil based material that is easy to work with and can be formed into any shape and wrapped around mating parts to create a seal.
The drawback is that it dries out and becomes brittle, and can lead to a leak. Instead, use a 100 percent silicone caulk (not a silicone/acrylic latex caulk), which won’t dry out.
When installing a top-mounted sink, apply a thick bead of silicone caulk around the rim prior to seating the sink in the countertop. Press down firmly, but don’t wipe off excess caulk that is squeezed out. If you allow the caulk to set first (usually 24 hours), the excess can be trimmed off with a utility knife.
–By Bruce Webb, general contractor
