
How to install underfloor radiant heating

One of three intended electric radiant heat mats is in place and secured with double-sided tape and staples. The main substrate is two layers of 19/32-inch exterior-grade plywood, and we used ¼-inch cementitious backerboard beside the heat mats to provide a level surface for the tile.
Contractors wanting to install underfloor radiant heating should have no trouble – even if they’ve never installed one as it is very straightforward.
In this example, three separate HeatWeave electric radiant heat mats from Watts Radiant were installed in a three-season room designed to accommodate a hot tub. Since the hot tub was too large to be removed from the room, it had to be moved to one side of the area while radiant heat mats and tile were installed (including grout), then carefully moved on top of the newly installed tile (after waiting long enough for everything to set properly) while the rest of the room was finished.
Here is the step-by-step procedure to install underfloor radiant heating that we followed. More detailed instructions on voltage requirements, clearance from obstructions, and other safety requirements are included in the manufacturer’s installation recommendations. Be sure to read the instructions carefully and thoroughly before beginning installation.
Step 1: Plan your layout to install underfloor radiant heating
The homeowners wanted radiant heat to warm the floor around two sides of the hot tub perimeter, extending out into the center of the room. The first step to to install underfloor radiant heating is to know the final placement of the hot tub so the mats could be placed close, but not under the unit.
Since three mats were being used to install underfloor radiant heating, we planned so all three power leads (wires leading to the thermostat control) would be placed in one location near the wall. This makes it easier to run the leads through one location in the bottom plate of the wall where the thermostat was to be placed.
Step 2: Install the underfloor heating
Roll out all the mats and test fit them in their intended locations to ensure a proper fit and that power leads will be long enough to reach the thermostat. Since the heat will conduct 2 inches or less from the heating wire, mats should be installed continuously across the area to be heated. Be very careful not to install mats so that any wires are closer than 2 inches from each other or overlap.
This system included double-sided tape to secure the mats to the floor, but we stapled the mesh (NOT the heating wires) as well to provide a more secure attachment and ensure the mats stayed flat against the floor.

Orient the mats so the power leads and sensor wire can be easily placed near and fed into the electrical control box (thermostat). Notice the thinset, backerboard and tile layers at left in the photo – this shows where the first mat was installed under the tile before moving the hot tub back to finish the other half of the room.
Step 3: Feed the wire
Feed the power leads and sensor wire to the control electrical box, which should be installed by a licensed electrician. Take extra care where wires meet the wall. You may have to chisel a part of the bottom plate away so the wires lay flat along the floor before changing direction inside the wall cavity to go up to the box.
Place a metal plate over this transition point to protect the wires from nails when wall coverings and/or trim are installed.
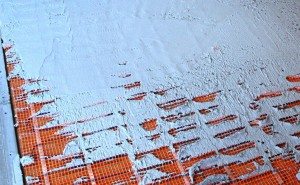
Spread a uniform layer of thinset over the heat mats, using a straight board to “screed” it to a smooth surface level with the backerboard. The thinset does not have to be perfectly smooth and flat, but be aware of any high spots (higher than the backerboard) and fill in obviously thin spots.
Step 4: Embed the mats
The underfloor heating mats must be fully embedded in mortar or thinset for tile installation. Since the mats were not being installed over the entire floor, this would create an uneven surface where the mats met the unheated floor.
The preferred method for dealing with this is to secure the mats and then pour self-leveling floor compound over the entire floor to make one flat, level surface. We chose the less expensive method, securing ¼-inch cementitious backerboard to the floor where there were no mats.
We then embedded the underfloor heating mats in a layer of thinset and used a straight board to “screed” the thinset, making sure it was flat and level with the adjacent backerboard. To make sure we didn’t nick any of the insulation off the heat wires, we used a grout float to spread the thinset instead of a metal trowel.

Once the thinset covering the mats has cured about 24 hours, you can install tile as you normally would. Be careful to achieve full thinset coverage when installing over the mats to make up for any unevenness in the first thinset layer – you may have to back-butter tiles when placing them over the mats embedded in thinset.
Step 5: Set the tile
After the thinset had time to properly cure (about 24 hours), we began laying tile and grouting as we would normally. After the grout had cured 24 hours, we moved the hot tub on top of the newly tiled area and finished the room in the same manner.
Step 6: Install the underfloor radiant heating control

The finished job is smooth, flat and seamless. While it takes a while for the system to heat up the tiles, it performs well.
A licensed electrician should make the electrical connections inside the control and at the circuit breaker or branch circuit source. Energize the system briefly (no longer than 10 minutes) to test operation of all components.
Do not put the system into full operation until thinset, mortar, grout, etc., are fully cured, which can be anywhere from two to four weeks after installation.
—By Rob Fanjoy
