
How to create fancy inexpensive crown molding looks
Here are three ways to create fancy inexpensive crown molding looks and deliver the appearance of luxury for less to a client with a limited budget.
Stack a few layers of inexpensive trim. It costs less than one-piece crown molding, but if you choose nice-looking pieces, the effect will be the same. And mounted at ceiling-height, nobody will be able to tell the difference between several low-cost stock pieces and a single piece of decorative molding.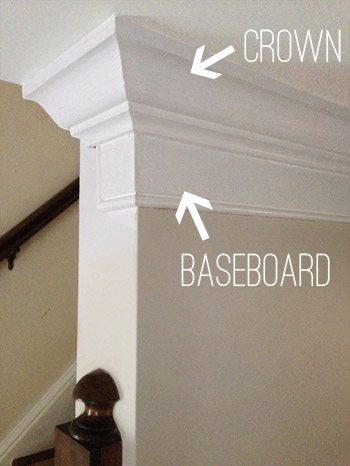
Ron Hazelton, host of Ron Hazelton’s Housecalls, suggests building a model with small pieces of trim before committing to the style and material. Layer the trim in different configurations to create a profile and a weight that your homeowner-client likes. Glue it together, and then cut and install it as you would if you were building up multiple layers of traditional crown molding.
Layer a one length of cornice molding with a single piece of stock baseboard. Turn the baseboard upside down and cut on a 45-degree angle. Add a cornice—or pediment—molding, already angled at 90 degrees. When you stack the cornice on top of the trim piece, it looks like a single piece of high-end crown molding.
Here’s a tip from blogger Kristin Salazar. Measure the wall twice: once before installing the baseboard, and again after the baseboard is nailed to the wall. “You do not want to measure these at the same time,” she advises.
Sandwich a single length of an embellished piece of crown molding—between two base molding backers. Contractor Mark Clement, author of The Carpenter’s Notebook, calls it a “simple trick.”
Clement’s advice: Install the three pieces layer by layer in laps around the room until everything is set. He starts with a mockup of the entire assembly, and uses it to strike lines at all of the corners, which keeps reveals even.
Install two thin pieces of molding two inches apart, and paint in between. From floor-level, the ceiling-height molding will look like a single, embellished piece if you paint the molding and gap the same color.
If a one-piece molding already embellishes the top of the wall, contractors suggest installing a second molding underneath will add drama and depth to the profile.
Stencil a crown molding profile—but skip the molding. Granted, a paint-only, wall-top design lacks the depth and profile of genuine molding or trim. Still, paint alone is a far less expensive way to create a border that will look stylish and dramatic to anyone looking up to the ceiling.
Molding wall stencils cost as little as $20 and come in styles that mimic dart, beaded and even classical moldings. Another $20 will buy you stencil brushes. Stencils usually are plastic and include at least two layers.
Begin to create fancy inexpensive crown molding looks by fixing painter’s tape to the ceiling at the edge of the wall. Using the stencil, mark the wall with a pencil to show how deep the stencil’s design will reach.
Then, select a color of stencil paint that coordinates with the room’s décor, in three hues: dark, medium and light. Using the lightest color, paint the area you penciled off.
Spray the back of the first stencil with adhesive and press it onto the dry paint. Dab the medium shade of paint over the stencil. Carefully remove the stencil and move it and press it against the next section of the wall.
When the first later is finished, do the same with the next stencil, but with the darker paint. The dark paint adds the illusion of depth which helps create fancy inexpensive crown molding looks.
— Sharon O’Malley
