
3 steps for prepping a shower for tile
Installing tile in a shower wall and floor without the proper prep work can result in leaks, mold and expensive repairs down the road. Here are step-by-step instructions for prepping a shower for tile correctly.
Step 1 Check stud walls
- Check every stud wall in the shower to make sure they’re plumb, not protruding and don’t have irregular surfaces. Fix any problems before proceeding.
 Step 2 Construct shower walls
-
- Install cement backer board on all shower walls using coated cement board screws. Cover each screw with fiberglass mesh tape.
- Dry fit your choice of waterproof membrane to the cement board. Mark any areas where you’ll need to cut holes for fixtures, but do not cut the membrane. Set the membrane aside.
- Wipe down the backer board surface with a wet sponge.
- Mix mortar and then apply to the backer board with the flat side of a trowel.
- After covering the entire wall with mortar, use the towel’s notched edge to rake the mortar from side to side to create an even ridged thickness.
- Press the waterproof membrane into the mortar, getting rid of excess air bubbles with the flat side of the trowel.
- Vertically crease 4-inch-wide strips of the membrane. Starting from the top of the wall, apply mortar to the corners of the shower, extending out at least 3 inches on both walls. [I am a bit confused. You say earlier that you should cover the entire wall with mortar.]
- Press the strips into the mortar so they overlaps 2 inches on each wall.
- Cut an X-shaped slit over any fixtures or openings.
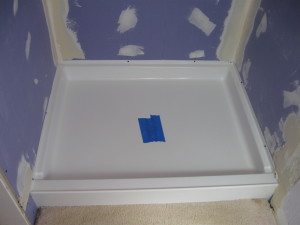
Step 3 Install shower floor
Use pre-made fiberglass or extruded foam floor kits, or build one with mortar, cement, bonded waterproof membrane and tile.
-
-
- If using a preformed shower pan, dry-fit pan into position. Mark the center of the floor drain, remove the pan and use a drill and 4-inch-diameter hole saw to cut the drain hole into the subfloor.
- Wipe the subfloor with a damp sponge.
- Spread a thick layer of mortar over the subfloor using the notched side of your trowel.
- Set the preformed pan into the mortar, walking over it to firmly press it in.
- Spread mortar onto the walls and into the inside corners of each wall around the floor pan. Use the preformed corners that come with the kit and press them into the fresh mortar. Press in and smooth out any bubbles.
- Use one continuous strip of membrane and mortar to waterproof the seams that run along the bottom of the vertical walls and the floor. Crease and apply the membrane, overlapping at least 2 inches vertically and horizontally along each wall.
- Dry fit your drain into the floor pan, then remove. Spread a thin layer of mortar around the drain hole.
- Insert the drain assembly. Trowel flush excess mortar that oozes out of the opening.
- Spread a layer of mortar over the entire surface of the floor pan, avoiding the drain opening assembly.
- Apply a pre-measured cut sheet of membrane to the floor pan, pressing it into the mortar. Using the flat edge of the trowel, remove air bubbles.
- Install the preformed curb, using mortar and membrane as you did with the floor pan.
- Install the drain system or kit according to manufacturer’s instructions.
-
Now you are ready to install the tile. Read more about how to tile a shower wall.
– Becky Blanton
