
How to repair mortar joints

Clean out the damaged joint as thoroughly and carefully as possible. Work slowly and do not damage the brick.
Because mortar joints in a masonry wall deteriorate over time due to age, weather, structural settlement and physical damage, heres how to repair mortar joints. Properly maintained mortar joints are a key factor in the longevity of the wall, and if left unrepaired, damaged joints will continue to deteriorate, allowing water into the cavity behind the face brick. Water behind brick face will ultimately lead to the failure of the wall itself, and what started out as a relatively simple, inexpensive repair can become a very costly repair.
Once you have examined the failing mortar joints, estimate the lineal footage of repair you anticipate to repair mortar joints and take a piece of loose mortar to your building supply store. With some professional assistance, you can match the correct mortar color, and determine the type, strength, coefficient of thermal expansion and quantity you need. The new mortar needs to look like, and even more importantly perform like, the existing mortar that remains.
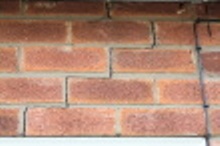 If the cracked mortar joints follow a “stair step” pattern from horizontal to vertical to horizontal and so on, this is a sign of a structural or roof issue. If the stair step occurs in the lower 2/3 of the wall, it is most likely due to foundation settlement or some other structural failure. If the crack is closer to the roof line, it may be an indication that the wall is taking in water, and the freeze-thaw cycle is putting lateral stress on the masonry. Either of these conditions should be investigated for proper diagnosis and repair.
Note: The accurate terminology for the repair of loose or missing sections of mortar joints in existing walls is “repointing.” The term is often confused with “tuckpointing,” which is a way of giving a visual impression that very fine joints have been made by using two contrasting colors of mortar, and “pointing,” which refers to correcting defects or the finished appearance of mortar joints in new masonry walls.
[tip id=”9862″]Step 1
To repair mortar joints, clean out the damaged joint as thoroughly and carefully as possible. Work slowly and do not damage the brick. On small projects this can be done with a small chisel and a hammer. On newer walls where the mortar may have a higher content of harder Portland cement, or where the linear footage is greater, a power tool with a masonry blade is more effective. Be cautious if you are working with a power tool. The dust created by grinding mortar should not be inhaled, and you should wear proper PPE (personal protective equipment), including a respirator, face mask, gloves and long-sleeved shirts and trousers.
Step 2
Remove the deteriorated mortar to a depth equal to, or slightly deeper than the height of the joint. If the depth of the removed mortar is greater then 2½ inches, you should re-point with new mortar in several successive passes, and allow each layer of mortar to dry thoroughly. The goal is to create a new joint, as rectangular as possible, that meets sound mortar, to give the mortar a better chance of bonding with the brick above and below the joint.

Mix your mortar in a metal bucket or shallow pan with a masonry trowel to achieve the consistency of a thick milk shake.
Step 3
Mix your mortar in a metal bucket or shallow pan with a masonry trowel. Follow the manufacturer’s instructions, but in general you are trying to achieve the consistency of a thick milk shake, so you can slice a piece with your trowel. You can also add a liquid latex binding agent to improve adhesion and make the new joint more resistant to cracking. Avoid letting the wet mortar come in contact with your skin; the reaction of the lime and Portland cement can cause an irritating burn. If you do get the mortar on your skin, wash it off immediately.

Using the trowel, rake the mortar and push it into the joint with the trowel. Work on small sections at a time because the mortar will continue to harden in your pan.
Step 4
In addition to a masonry trowel, you’ll need a palette, sometimes called a “mortar hawk,” which is basically a thin, square metal plate with a handle below that you can pile the mortar on as you use the trowel to push it into the joint.
You can make your own palette very inexpensively using a 10 inches x 10 inches piece of plywood with something screwed to the underside to act as a handle. You’ll also need a jointer, which is used to apply the final shape to the wet mortar and is typically a concave or “vee” shape. Here to, you want to match the existing joints as closely as possible.
When the joints are cleaned out, the mortar is ready, and you are ready to apply the mortar, mist the joints thoroughly with water. Place some mortar on your palette and hold the edge of the palette against and just below the joint. Using the trowel, rake the mortar and push it into the joint with the trowel. Work on small sections at a time because the mortar will continue to harden in your pan.

Place some mortar on your palette and hold the edge of the palette against and just below the joint. Using the trowel, rake the mortar and push it into the joint with the trowel.
Step 5
Once the mortar is placed and starts to set use the jointer to create the final face surface of the joint.
When the repair is complete, mist the joints again with water, and then daily for the next two to three day. The hotter and drier the climate, the more misting is required, and you may need to cover the joints with plastic to retain moisture. Check with your building supply professional for any local tips that may help you in your specific climate.
Step 6
After 3 days, scrub the joints lightly with a
wire brush, and wash with water to rinse away any remaining dust or debris.
Diagnosing efflorescence
When you make a visual inspection to determine the condition of the mortar joints, you may notice a white, chalky substance that appears on the face brick. This is called efflorescence and is actually salt within the brick that is leaching out through the brick because water has gotten behind the brick.
In new brick structures, this efflorescence can occur even though the wall is properly constructed. In this case, the brick can be cleaned and the efflorescence should not re-occur. But in older buildings, it’s a strong indication that flashings, caulking, expansion joints, lintels, shelf angles, related masonry details or the mortar joints are failing (likely, it’s a combination of several of these) and allowing water to get behind the brick.
—By Bruce Webb
